How to Perform DPT Testing – 7 Easy Steps to Success

Introduction:
How to perform DPT testing? Dye penetrant testing (DPT) is a widely used, cost-effective method for detecting surface-breaking defects in materials such as weld joints. This non-destructive testing (NDT) technique is especially effective for identifying cracks, porosity, and other surface imperfections that could compromise the integrity of a weld.
The simplicity of DPT lies in its ability to reveal defects using visible dye or fluorescent penetrants. With minimal equipment and straightforward procedures, it provides reliable results without damaging the tested material.
Whether you are a professional welder, an inspector, or a beginner in the field, this easy-to-follow guide will help you perform DPT testing accurately and efficiently.
7 Easy Steps to Success to DPT Testing:
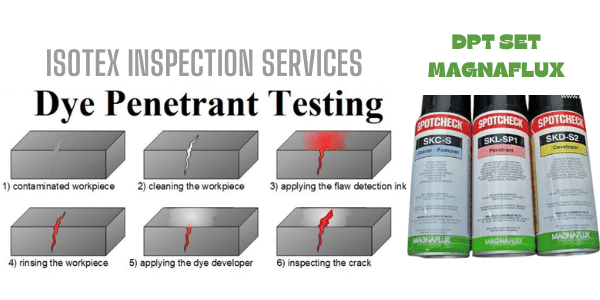
Dye Penetrant Testing (DPT) is a reliable method for detecting surface-breaking defects in weld joints. Follow these simple steps to ensure effective testing and accurate results:
Step 1: Surface Preparation
Start by cleaning the weld area thoroughly. Use a suitable solvent or cleaner to remove oil, grease, paint, dirt, or any debris. A clean surface is critical to prevent interference during testing.
Step 2: Applying the Penetrant
Evenly apply the penetrant to the cleaned weld surface. Use a spray, brush, or pour method to ensure full coverage. Make sure the penetrant flows smoothly over the entire area to detect any possible defects.
Step 3: Allowing Dwell Time
Let the penetrant sit on the surface for the recommended dwell time, typically specified by the product manufacturer. This step allows the penetrant to seep into any cracks or defects on the surface.
Step 4: Removing Excess Penetrant
Carefully remove any excess penetrant from the surface using a lint-free cloth or a cleaning solution. Avoid over-cleaning, as this may remove penetrant from defects.
Step 5: Applying the Developer
Spray or spread the developer evenly over the weld surface. The developer draws out the trapped penetrant, highlighting any defects as visible marks. Ensure complete and uniform coverage.
Step 6: Inspecting the Weld
Under proper lighting conditions, inspect the weld surface for visible indications. Defects will appear as clear, contrasting marks or lines. Document all findings, including defect locations and dimensions.
Step 7: Final Cleaning
After the inspection, clean the weld surface thoroughly to remove any residual penetrant or developer. This ensures the area is ready for further processes like welding, painting, or other treatments.
Key Tips:
- Always follow the manufacturer’s instructions for penetrant and developer usage.
- Use appropriate personal protective equipment (PPE) during the process.
- Maintain proper lighting for accurate defect detection.
This step-by-step guide simplifies the DPT process, ensuring it is easy to understand and implement while yielding precise results.
Conclusion:
Dye penetrant testing (DPT) is an essential and highly effective non-destructive testing (NDT) method for identifying surface defects in weld joints. By following this simple step-by-step procedure, you can ensure reliable inspections that enhance the safety and quality of welded structures.
The ease of use, cost-effectiveness, and versatility of DPT make it a go-to solution for weld inspections across industries. Whether you are working in manufacturing, construction, or maintenance, mastering this process can help you identify potential issues early and prevent costly failures.
Incorporate DPT into your quality control practices today to achieve precise results and maintain high safety standards. For more expert tips and techniques on welding and inspections, stay connected!

Standard:
ASTM (AMERICAN SOCIETY OF TESTING AND MATERIALS)
- ASTM E 165: Standard Practice for Liquid Penetrant Examination for General Industry
- ASTM E 1417: Standard Practice for Liquid Penetrant Testing
- ASME BPVC, Section V, Article 6: Liquid Penetrant Examination
- ASME BPVC, Section V, Article 24: Standard Test Method for Liquid Penetrant Examination SE-165 (this standard is identical to ASTM E-165)
CEN (EUROPEAN COMMITTEE FOR STANDARDIZATION)
- EN 1371-1: Founding – Liquid penetrant inspection – Part I: Sand, gravity die and low pressure die castings
- EN 1371-2: Founding – Liquid penetrant inspection – Part II: Investment castings
- EN 10228-2: Non-destructive testing of steel forgings – Part II: Penetrant testing
- EN 10246-11: Non-destructive testing of steel tubes – Part 11: Liquid penetrant testing of seamless and welded steel tubes for the detection of surface imperfections
FAQs
How Can You Perform DPT Testing on Weld Joints?
Performing DPT testing involves cleaning the weld surface, applying penetrant, allowing sufficient dwell time, removing excess penetrant, applying a developer, and inspecting under proper lighting. Following a step-by-step procedure ensures accurate defect detection and reliable results.
Can DPT Testing Detect Hidden Weld Defects?
No, dye penetrant testing (DPT) is specifically designed to detect surface-breaking defects in weld joints. It cannot identify internal or subsurface flaws. For detecting hidden defects, advanced techniques like ultrasonic or radiographic testing are recommended.
What Are the Common Mistakes to Avoid During DPT Testing?
Common mistake is inadequate cleaning of the weld surface, which can lead to inaccurate results. Another is insufficient dwell time for the penetrant, reducing its ability to seep into defects. Over-cleaning during excess penetrant removal can also disturb trapped penetrant in defects. Always follow the procedure carefully to avoid these errors.
How Does the Developer Enhance the DPT Inspection Process?
The developer plays a crucial role in DPT testing by drawing out penetrant trapped in surface defects. It creates a contrasting background, making even small cracks or imperfections visible under proper lighting. Using the developer correctly ensures accurate and reliable defect detection.
Performing DPT testing involves cleaning the weld surface, applying penetrant, allowing sufficient dwell time, removing excess penetrant, applying a developer, and inspecting under proper lighting. Following a step-by-step procedure ensures accurate defect detection and reliable results.
No, dye penetrant testing (DPT) is specifically designed to detect surface-breaking defects in weld joints. It cannot identify internal or subsurface flaws. For detecting hidden defects, advanced techniques like ultrasonic or radiographic testing are recommended.
Common mistake is inadequate cleaning of the weld surface, which can lead to inaccurate results. Another is insufficient dwell time for the penetrant, reducing its ability to seep into defects. Over-cleaning during excess penetrant removal can also disturb trapped penetrant in defects. Always follow the procedure carefully to avoid these errors.
The developer plays a crucial role in DPT testing by drawing out penetrant trapped in surface defects. It creates a contrasting background, making even small cracks or imperfections visible under proper lighting. Using the developer correctly ensures accurate and reliable defect detection.
dLrZk zjMDYLJ gKO